Herst.-Teilenr. 189
PIR (MOTION) SENSOR
Adafruit Industries LLC
License: See Original Project
Guide by Tony DiCola
Do you need a last-minute Halloween decoration to scare your friends and trick-or-treaters? Try building a scream box that lets out blood-curdling screams when it's opened! By using a passive infrared (PIR) motion sensor and an Audio FX board you can build this scream box without even using a separate microcontroller or writing any code!
Before you get started it will help to familiarize yourself with the following guides:
You'll need the following parts for this project:
Pick up the Audio FX board with line level output if you have an amplified speaker to play sound or get an Audio FX board with integrated amplifier if you have just a small speaker driver.
Small portable speaker
Pick a speaker that can connect to your Audio FX board, either an amplified speaker to connect to the Audio FX board with line level output or a speaker driver to connect to the Audio FX board with built in amplifier.
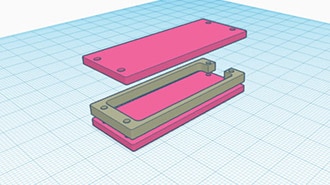
Small box to hold all the components
Let your imagination run wild with what will hold the components and how it will be decorated. Check out local craft stores for pre-made wooden or paper-mache boxes that are a great starting point.
Make sure to use exactly 3x AA (or AAA) batteries. If you use 4 or more batteries the voltage will be too high (6+ volts) and could damage the Audio FX board.
1x NPN transistor
This is used to invert the PIR sensor signal into an active low signal that the Audio FX board expects. Alternatively, you could use a 74HC04 as mentioned in the remote sound board guide.
1x 100 kilo-ohm resistor, 1/4 watt
1x 1 kilo-ohm resistor, 1/4 watt
Connect the parts as shown in the diagram below:
Most of the wiring is relatively straightforward, just connect component grounds to battery ground and component VIN/voltage input to battery positive voltage.
For the PIR sensor if you haven't used it yet make sure to read its guide to understand how to hook it up and adjust its sensitivity.
However, for the NPN transistor pay special attention to how it's oriented and connected to components. With the flat side of the transistor facing, you the emitter is the left-most leg, the base is the middle leg, and the collector is the right-most leg. The emitter should be connected directly to battery ground. The base should be connected to a 100 kilo-ohm resistor which is connected to the PIR sensor output (middle yellow wire). Finally, the collector should be connected to both the 1 kilo-ohm resistor up to battery positive, and any of the switch inputs on the Audio FX board (like switch 5 shown above).
If you're curious you can find more details about using an NPN transistor as an inverter/not-gate on this page.
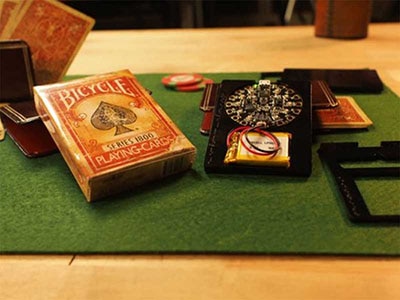
Finally plug in or connect your speakers to the audio output of the Audio FX board. Place all the components into your box and make sure the PIR sensor is facing up at the opening of the box. That's it, your hardware is assembled!
Here's what my hardware setup looks like:
With the hardware assembled you're ready to load sounds on the Audio FX board. First make sure you've read the Audio FX board guide to audio files are copied to the board. Then connect the Audio FX board's USB micro connector to your computer or laptop. You should see your computer mount the Audio FX board as a USB mass storage device.
Next, you'll want to gather some sound files to copy to the Audio FX board. I found some scary scream sound effects on archive.org, such as:
Wilhelm Scream - This is a classic scream that's used in almost every horror film!
https://archive.org/details/Scream_201303
Make sure to download the Ogg Vorbis or WAV versions of the sound effects. The Audio FX board can't play other formats like MP3.
Since there's only one trigger from the PIR sensor to the Audio FX board, you probably want to use the randomization feature of the board to play a random scream or other scary sound. To use randomization, rename all your files to the format:
TxxRANDn.OGG or TxxRANDn.WAV
Where xx is the number of the trigger input on the audio board and n is a number from 0 to 9 to identify up to 10 sound files that will randomly be chosen for playback. In my case I'm using Audio FX input number 5 and have 5 sound effects, so my files look like:
Once you've copied the files to the Audio FX board eject the drive from your computer and unplug the device. Now turn on the battery power and you will likely hear the sound effects play for a moment as the PIR sensor starts up. Close the box and try opening it. Surprise! You should hear a random scream! The PIR sensor will continue to play screams until you close the box, and it stops detecting motion.
If you don't hear screams, make sure the speaker is turned on and that you can see the green power LED on the Audio FX board. When the PIR sensor detects motion and triggers a sound you should see a red LED on the Audio FX board turn on. If you don't see the red LED turn on or hear the sound, then you might need to adjust the PIR sensor sensitivity. Check out the PIR guide for more details on adjusting the sensitivity. You can also play with the retriggering and delay time on the PIR sensor to have it play for longer or shorter times.
That's all there is to building the Halloween scream box project! Try scaring unsuspecting friends or coworkers by putting the box on your desk. Or you can even mount the hardware under someone's desk to really give them a fright when they sit down! Have fun and happy Halloween!