Herst.-Teilenr. 12795
JUMPER WIRE M/M 6" 20COND
SparkFun Electronics
License: See Original Project Wireless Arduino ESP32 ESP8266
Courtesy of SparkFun
Introduction
In the past couple weeks I've been experimenting with LuMini Rings and RGB Matrix Panels. Some interesting examples to make them really pop. In the process, I stumbled across a few neat examples by ThingPulse that integrate an ESP8266 with Spotify® to control songs as well as pull down the JPEG related to the album art. I had some square matrices and an ESP32 so I figured album art would be perfect. I tried this example on the LuMini Matrices, it looked beautiful and bright, but I simply didn't have enough boards at the time to reach a high enough resolution (I had 4 boards for a total resolution of 16x16 pixels) where the album artwork looked good. While I slowly gave up on the neat example that pertained to my products in lieu of other pursuits, my coworker Wes jumped in with our 64x64 Matrix to save the day. Wes adapted my super low resolution LuMini examples to work with our 64x64 matrix, this tutorial covers just how to connect that matrix up and get it displaying some neat album art!
Required Materials
For this project, you'll need some jumper wires, an ESP32 Thing, headers, a 64x64 matrix, and a power supply capable of sourcing 2 amps. Many wall warts will work for this task, but we've included a few in the wishlist below. You may not need everything though depending on what you have.
Spotify Album Art Display Wishlist SparkFun Wish List
USB Wall Charger - 5V, 1A (Black)
Note: Remember, the RGB LED Panel can pull a lot of current when all the LEDs are turned on at full brightness. We recommend powering the panel with an external power supply (i.e. the 5V wall adapter with barrel jack) separate from the ESP32. Just make sure to ground the circuit together.
Tools
You will need a soldering iron, solder, general soldering accessories, and a mini screwdriver.
Suggested Reading
Note: Keep in mind that the example code RGB Panel Hookup Guide uses a different example due to the limitations of a standard Arduino with panels greater than 32x64. However, the section on powering the panel is relevant to powering your project.
If you aren’t familiar with the following concepts, we recommend checking out these tutorials before continuing.
How to Power a Project: A tutorial to help figure out the power requirements of your project.
How to Install FTDI Drivers: How to install drivers for the FTDI Basic on Windows, Mac OS X, and Linux.
RGB Panel Hookup Guide: Make bright, colorful displays using the 32x16, 32x32, and 32x64 RGB LED matrix panels. This hookup guide shows how to hook up these panels and control them with an Arduino.
ESP32 Thing Hookup Guide: An introduction to the ESP32 Thing's hardware features, and a primer on using the WiFi/Bluetooth system-on-chip in Arduino.
Hardware Assembly
I usually solder some female headers to my ESP32 for ease of connection. If you're making a permanent fixture, it's probably a good idea to solder the connections straight into your ESP32 or make a custom shield. If you have not already, solder the headers or wires of your choice to your ESP32.
Hookup Table
Note: This is not your standard connection to RGB LED Matrix Panels. We'll be connecting pins from the input port to the port.
There should be two ports on the back of your matrix, one on the left (input) and one on the right (output). We'll refer to the port on the left as PI while the right as PO.
You'll have some connections between the input port and the output port. You'll have some connections between your ESP32 to the input port. Let's start with the connections between the two ports. Insert the 16-pin (2x8) ribbon cable into the PI port. Then using the M/F jumper wires between the following pins.
You'll then need to connect much of your color data to the output port. Finish the connection between your PI port and the ESP32 using the following table using M/M jumper wires.
Power Connector
At this point, you can go ahead and connect your selected power supply to 5V and ground on the back of the display using the 4-pin polarized cable and barrel jack adapter. If you are powering the panel with a separate power supply, make sure to connect ground for reference. If you are powering the panel and ESP32 off a single power supply, make sure you add a 5V line going to either of your ESP32's VUSB pins.
Software Installation
Note: This example assumes you are using Arduino IDE v1.8.5 on your desktop. If this is your first time using Arduino, please review our tutorial on installing the Arduino IDE. If you have not previously installed an Arduino library, please check out our installation guide.
You'll need to download all the libraries for this project. In the Arduino IDE, include them all by going to Sketch -> Include Library -> Add .ZIP Library... and adding each of the following libraries:
Example
Click the button below and unzip the project files.
SPOTIFY ALBUM COVER DISPLAY (ZIP)
Setup and Configuration
Note: When opening the Spotify-Album-Display.ino sure that the following files are also included in the same folder:
SpotifyClient.cpp
SpotifyClient.h
settings.h
Go ahead and open the Spotify-Album-Display.ino sketch. We'll need to change a few things to set our ESP32 up, so head on over to the settings.h file.
First, we'll need to change our ssid and password to that of our local network. We'll then need to find the clientID and clientSecret that match your Spotify account. To do this, head to Spotify's Developer Login page.
Log in and click on the "My New App" button. You'll see a window pop up as shown below. Fill out the form. It's okay to put "I don't know" in the checkbox.
Spotify Form
Go to "Edit Settings" on your app, change the redirect URL to the following in your web browser:
http://esp32.local/callback/
Make sure the esp32 section matches your espotifierNodeName in settings.h and save your settings. Now that you've created your "app", go ahead and copy the clientID and clientSecret and paste them into their respective variables in 'settings.h'.
Upload
Now that you've got things configured, you can go ahead and upload the code to your ESP32. Make sure to select the SparkFun ESP32 Thing as your board and the COM port that it enumerated on. Grab a coffee or do some jumping jacks or something while it compiles.
Once things have uploaded, open your serial terminal to 115200 and reset the ESP32 to make sure it is properly connecting to your WiFi network. Take note of the IP address. We now have to generate a token that our ESP32 can use to access the Spotify API. This token gets loaded once from Spotify then saved in the file system of the ESP32. Therefore, you'll have to complete this step once each time you use a new ESP32, but then the device will boot up and load the token from memory, pretty cool.
Now open your browser and navigate to the IP address. This should bring up a Spotify page, asking you for permission to access your account, hit accept. This will redirect you to another URL that begins with esp32.local/callback/, check out the below image to see what I mean.
Replace Part of URL with IP Address
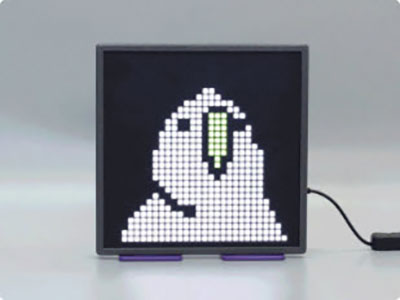
Replace the esp32.local section with your IP address and hit enter on your keyboard. You should now see a message telling you to restart your ESP32. Go ahead and listen to that. Restarting your ESP32 should begin pulling in and translating your JPEG to the screen. Change what song you're playing on Spotify and the image should follow.
Album Art Demo
Resources and Going Further
For more information, check out the resources below:
GitHub Libraries